Vectorization part2. Warmup.
27 Oct 2017
Subscribe to my newsletter, support me on Patreon or by PayPal donation.
I want to do this warmup post, just to be sure that we are on the same page. It will also give you the taste of how the vector assembly looks like and how it works. I remember when I was learning vectorization stuff, I really missed the assembly that was generated by the compiler. I was like: “Show me assembly, I want to see how it’s done.” Even if there was assembly I didn’t understand how this hairy scary lines of code do the job.
I find the example in this post somewhat special. It might be not the most efficient assembly code, but in my opinion it nicely shows capabilities of the vectorization. So, in this post we will go through an assembly code line by line, visualizing the state of the registers after some portion of assembly code.
Here is the example: godbolt.
In general, compiler has quite hard time dealing with various control flow statements inside the loop when trying to vectorize it. Vectorization gets much harder when there is if statement inside the loop, and even infeasible when there is a break or throwing exception. However, in our example there is if statement and the loop was successfully vectorized by gcc.
int foo( short a[16], unsigned short b[16], unsigned short bias[16] )
{
  int agg = 0;
  for( int i = 0; i < 16; i++ )
  {
    if( a[i] > 0 )
      a[i] = (bias[i] + a[i]) * b[i] >> 16;
    else
      a[i] = - ((bias[i] - a[i]) * b[i] >> 16);
    agg += a[i];
  }
  return agg;
}
Loading
Let’s look at first 4 instructions. Description of all instructions can be found here.
 vmovdqu ymm4,YMMWORD PTR [rdi] # a[]
 vmovdqu ymm2,YMMWORD PTR [rdx] # bias[]
 vmovdqu ymm5,YMMWORD PTR [rsi] # b[]
 vmovdqa ymm6,YMMWORD PTR [rip+0x5c6] # 400b00
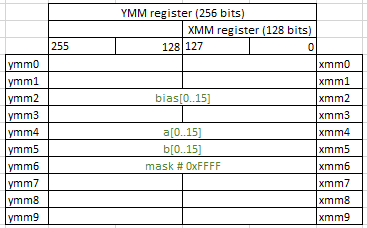
They load our input arrays into registers. By x86 calling conventions for 64 bit architecture our first three arguments are stored in rdi, rsi and rdx respectively.
Here is what values are in registers after this step (I removed registers ymm10-ymm15 because they are not used in this example):
Extracting
Because our computations can overflow the size of short, we need to use 32 bit integers for computation. That’s why we first “unpack” all the 16-bit values and make them 32-bit.
 vpmovzxwd ymm1,xmm2
 vextracti128 xmm8,ymm4,0x1
 vextracti128 xmm2,ymm2,0x1
vpmovzxwd ymm1, xmm2 instruction zero extend 8 16-bit integers in xmm2 to 8 32-bit integers and puts them into ymm1.
vextracti128 xmm8,ymm4,0x1 extract 128 most significant bits (3rd parameter 0x1 tells to do so) of integer data from ymm4 and store results in xmm8.
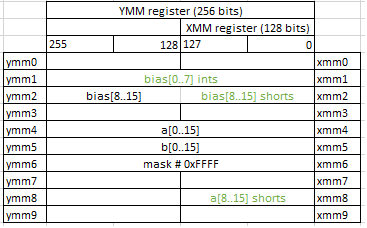
Next stage is mostly similar to the previous one, so I will just skip it and only show the result. You can trace it by your own.
 vpmovzxwd ymm9,xmm5
 vpmovzxwd ymm2,xmm2
 vpmovsxwd ymm0,xmm4
 vpmovsxwd ymm8,xmm8
 vextracti128 xmm5,ymm5,0x1
Computation
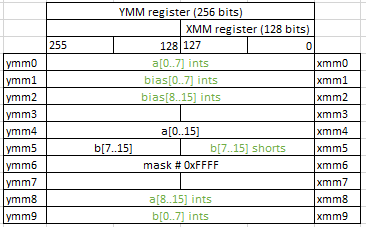
Up to this moment we prepared all data into separate parts. Next assembly blob is actually doing computation inside the loop.
 vpaddd ymm3,ymm1,ymm0
 vpmovzxwd ymm5,xmm5
 vpsubd ymm0,ymm1,ymm0
 vpsubd ymm1,ymm2,ymm8
 vpmulld ymm0,ymm0,ymm9
 vpmulld ymm1,ymm1,ymm5
 vpaddd ymm7,ymm2,ymm8
 vpmulld ymm3,ymm3,ymm9
 vpmulld ymm7,ymm7,ymm5
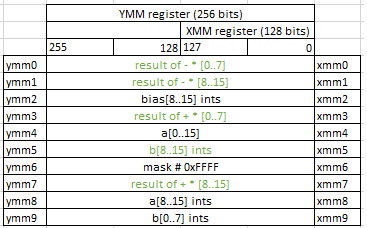
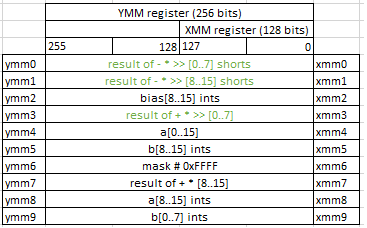
So, vpaddd, vpsubd and vpmuld do arithmetic operations on dwords and I believe you can easily extract what each instruction does from its name. I will mark temporary results with the signs of completed arithmetic operations. For example, bias[i] + a[i] as result of +, (bias[i] - a[i]) * b[i] as result of - *.
Updated state of the registers looks like this:
Finally, we do the right shifts.
 vpsrad ymm0,ymm0,0x10
 vpsrad ymm1,ymm1,0x10
 vpand ymm1,ymm6,ymm1
 vpsrad ymm3,ymm3,0x10
 vpand ymm0,ymm6,ymm0
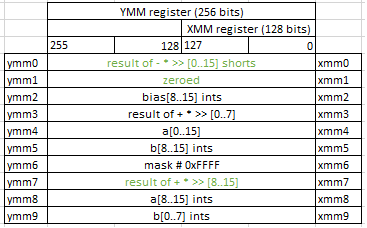
By doing vpand ymm1,ymm6,ymm1 we just zeroing most significant half of the bits of each value in ymm1 (recall that ymm6 has values 0xFFFF in it). We need to do that because vpsrad is doing sign extension after shifting.
Packing
 vpackusdw ymm0,ymm0,ymm1
 vpsrad ymm7,ymm7,0x10
 vpxor xmm1,xmm1,xmm1
vpackusdw ymm0, ymm0, ymm1 converts 8 16-bit signed integers from ymm0 and 8 16-bit signed integers from ymm1 and store them into 16 16-bit unsigned integers in ymm0.
Handling if statement
vpcmpgtw ymm4,ymm4,ymm1
vpand ymm3,ymm6,ymm3
vpand ymm7,ymm6,ymm7
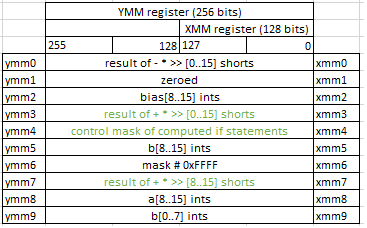
vpackusdw ymm3,ymm3,ymm7
This is the most interesting part of this example. Instruction vpcmpgtw ymm4,ymm4,ymm1 compares 16-bit signed integers for greater than. Effectively this instruction does all 16 comparisons just in one instruction. Amazing!
And for each pair of 16-bit ints it stores either 0xFFFF or 0 in the destination vector, depending on the result of the comparison.
Writing back
Note, that at this stage we have both branches of if statement computed (in ymm0 and ymm3) and we know all outcomes of the if conditions (in ymm4). So, we need to select proper values from correct branch results.
 vpermq ymm0,ymm0,0xd8
 vpermq ymm3,ymm3,0xd8
 vpsubw ymm0,ymm1,ymm0
 vpblendvb ymm0,ymm0,ymm3,ymm4
 vpmovsxwd ymm1,xmm0
 vmovdqu YMMWORD PTR [rdi],ymm0
vperfmq ymm0,ymm3,0xd8 permute qwords in ymm3 using indexes in the third operand(0xd8) and store the result in ymm0. We need to permute values in ymm0 and ymm3 because of the nature of vpackusdw (see above). When vpackusdw combines two arrays together it does interleaving. When combining a[0..7] and a[8-15] this instruction makes the output of a[0..3] a[8-11] a[4-7] a[12-15]. So, to receive correct result we need to swap elements in the middle. And this is exactly what vpermq instruction with the mask 0xd8 is doing.
vpsubw ymm0,ymm1,ymm0 simply negates all the values in ymm0, completing final steps of computation.
vpblendvb ymm0,ymm0,ymm3,ymm4 selects values from ymm0 and ymm3 according to the control in ymm4 and stores them into ymm0.
And finally, vmovdqu YMMWORD PTR [rdi],ymm0 stores values from ymm0 back to memory (in a[]).
What is left is calculate the return value (agg), bit I will leave this exercise for the reader.
Conclusions
I want to point out a couple of things we learned from this example.
- Note, that the loop was fully vectorized, meaning that there are no backward jump. It is simple for compiler to do because the trip count (number of loop iterations) is known.
- Still there is lots of scalar code. I will explain why we need it in the next posts. Stay tuned.
- Surprisingly, gcc is not using horizontal add for calculating
agg. Clang does, but it is only able to vectorize the loop when using GVN-hoisting (-mllvm -enable-gvn-hoist). link to godbolt. - There is not so much register pressure in this function. Registers
ymm10-ymm15are free for compiler to do something else. So, still there is some free space for the vectorizer to handle even more complex code.
As a final note I want to put a links to the two great presentations from CppCon2017:
- Matt Godbolt - “What Has My Compiler Done for Me Lately? Unbolting the Compiler’s Lid”.
- Charles Bailey “Enough x86 Assembly to Be Dangerous”.
All posts from this series:
- Vectorization intro.
- Vectorization warmup (this article).
- Checking compiler vectorization report.
- Vectorization width.
- Multiversioning by data dependency.
- Multiversioning by trip counts.
- Tips for writing vectorizable code.
All content on Easyperf blog is licensed under a Creative Commons Attribution 4.0 International License